
Monthly Archives: August 2016
In-Dev Build #10
Maybe these will continue to be a weekly thing after all!
Changes since previous version:
- Level generation algorithm modified to allow for more variations, particularly in single-screen rooms
- New prefabs added
- Procedural decoration for backgrounds and boss room entrances
Windows: GunArc.zip
Mac OS X: GunArc.dmg
Linux: GunArc.tar.gz
Accountability
So there’s a thing. Hold me accountable, internets.
Going back to the earliest days of this project, I had originally hoped to ship Gunmetal Arcadia in Fall 2016. But that was before contract work, before Zero, before parenthood. With each of those, shipping in 2016 became a little less viable, and eventually I began to assume it would land in 2017, but until now, I hadn’t had a firm release date.
This gives me twenty-four weeks from the time of writing to finish Gunmetal Arcadia. Setting aside the last week or two for fixing bugs, finalizing builds, attending PAX South, and last-minute panic, and assuming I get four work days per week (leaving Fridays for recording and rendering a video and outlining a blog post), that’s somewhere in the realm of ninety days remaining.
Tracking tasks per day this far out would be a pointless effort, because my predictions are consistently inaccurate in either direction and the landscape still uncertain in parts. But I do have a rough roadmap of everything that needs to be done by launch, and at a weekly granularity, things start to make a little more sense. So I’ve started putting together a tentative weekly schedule that gets me to launch by the end of January, and I’ll be revising it as the path becomes clearer.
This also marks a change in the direction I’ll be going with these blog posts. As I’m starting to exhaust the number of new features that I can mine for technical blogs, and as the video series is serving as a general “here’s-what-I’ve-been-up-to-recently” dev diary, I’ve been unsure of where to take the blog. (This happened in the final weeks and months of Zero‘s development as well). So what I’m going to start doing instead is using the blog to talk in high-level terms about my design goals for the coming week. In this way, I think the blog and the video should serve as nice bookends to each week, with the one defining some goals and projections and the other revealing how things actually turned out.
So, in that spirit, here’s what I’m looking at for this week. After finalizing the first draft of the roadmap and cleaning out my inbox of notes to myself about future tasks, I’m going to start working on some real, non-placeholder, actually-for-shipping level prefabs. (I’ll probably stream this, too, since I’m due for a stream sometime this month, although this post likely won’t go up until afterwards.) This will be informed by the stats gathering work I did a few weeks back, and as this also necessarily implies that level generation needs to be as close to being believably locked down as possible, I’ll probably spend a little time upfront making some last minute changes to generation.
For starters, I currently have an issue where doors can only appear on the bottom floor of a room. I’ve been meaning to address that for a while and keep forgetting because it isn’t always apparent as a bug unless you’re specifically aware of and looking for it. The other issue is boss rooms: these likely need to be prescribed and possibly associated 1:1 with the individual boss who will appear in that room. At minimum, they must not be constructed in such a way that the boss does not have a place to spawn, as has been happening in the last week or two since I added bosses.
If I have time, I’d also like to take on some cosmetic changes to levels, adding the skull-and-crossbones icons and vertical lines outside boss rooms, and maybe finding a better solution for “optionally solid” tiles set against various types of backgrounds, as discussed in a recent video.
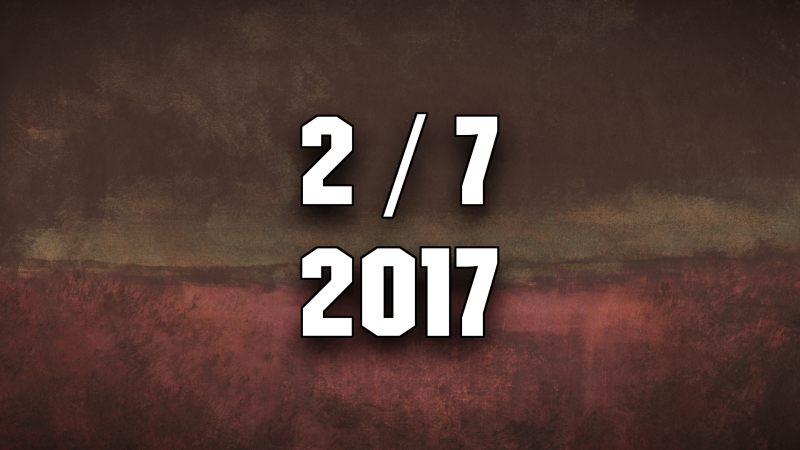
It’s worth pointing out that I haven’t announced a date for the wide release of Gunmetal Arcadia Zero yet, and I won’t — it’ll show up when it shows up (but it will be before the end of the year).
Anyway, one last time:
Gunmetal Arcadia will launch on Tuesday, February 7, 2017.
Episode 46: “Loadout”
In-Dev Build #9
I wasn’t planning to continue making these a weekly thing, but I was doing some build maintenance on Mac and Linux, and I figured I might as well publish another build while I was in those environments.
Changes since previous version:
- Added character selection to the three-slot interface
- Tentative character builds assigned
- Removed ceilings from prefabs
- Added an application icon to the Mac build
- Test content of session event effects: failure (by death or quitting) will increase the health cap to six hearts on the next session
Windows: GunArc.zip
Mac OS X: GunArc.dmg
Linux: GunArc.tar.gz
Audio Synthesis in Gunmetal Arcadia
The Gunmetal Arcadia Zero soundtrack is available for streaming and purchase in digital formats and on CD at Bandcamp.
I’ve written extensively about my CRT simulation technology, most recently in a Gamasutra article last year. But there’s another side to the retro nostalgia coin, one that I’ve discussed in bits and pieces but never documented fully until now: audio synthesis.
Just as my CRT simulation has evolved over the course of several games, so too has my synth implementation grown and changed, and for the sake of simplicity, I’ll be focusing on the version shipped in Gunmetal Arcadia Zero, with notes on other games where applicable. As a point of comparison, the earliest implementation, heard in You Have to Win the Game, was intended to recreate the sound of a PC speaker and featured only a monophonic square wave controlled by an MML-like language.
As the Gunmetal Arcadia titles are intended to evoke the sights and sounds of the NES, I’ve designed the audio synthesis to work roughly within the limits of that console’s Ricoh 2A03 sound processor. As with the games’ visuals, however, I’ve bent the rules in some places, either in the interest of improving the player experience or to help faciliate a better workflow for myself.
The 2A03 has five voices: two pulse waves, a triangle wave, a noise generator, and a DPCM channel (delta pulse-code modulation) capable of playing low-resolution sampled sound effects. Due to the limited memory available on the NES, the DPCM channel was most often used for short drum and percussion samples, but it was also used for bass, speech, and more. I’ve chosen to ignore this channel, using the random noise generator for percussive sounds instead, so I won’t be discussing it further.
The pulse waves can be given duty cycles of 12.5%, 25%, 50% (square), or 75%. It’s worth noting, however, that the 25% and 75% settings sound identical, as their waveforms are inversions of each other. This effectively gives us three unique sounds, ranging from full and mellow (50%) to brassy and strident (12.5%). In conjunction, these two channels often serve as the primary melody and harmony in many NES games and in my own compositions. These channels may also vary in volume, with sixteen discrete levels to choose from.
The triangle wave has no optional settings. Its shape cannot be altered, nor can its volume be changed. It is also interesting to note that its shape does not consist of a perfectly linear rise and fall, but rather it moves in steps, sixteen steps to be precise, corresponding to the levels available to the pulse wave’s volume. Although the triangle sounds pleasant at middle pitches, its lack of expressive control makes it less suited for lead melody than the pulse waves, and it is often used for bass notes and rhythm parts instead.
The noise generator behaves similarly to a pulse wave, but the state of the wave at any given time (high or low) is produced by a simple pseudorandom number generator. Specifically, it uses a linear-feedback shift register, or LFSR. LFSRs may take a number of forms, but in this case, it is a fifteen-bit value whose next state is a produced by some bit-shifting magic, as detailed on the Nesdev wiki. The most significant bit determines the state of the waveform, with the state of the LFSR advancing once per oscillation, at a rate depending on the frequency of the note being played. The volume of the noise generator can be adjusted (in sixteen increments, same as the pulse waves), and it can also be put into two modes, “looped” and “unlooped.” In the default unlooped mode, assuming a proper initial state, the LFSR will cycle after 32,767 iterations, sufficient to sound random to the human ear. In the looped mode, the LFSR cycles after only 93 iterations, producing a sound often described as a metallic buzzing or screeching. The exact nature of this sound depends on the current state of the LFSR when it entered the looped mode; in some cases, it may loop after a shorter duration of only 31 steps.
It is also important to note that the noise generator is only capable of producing sounds at sixteen predetermined frequencies, but these cover a wide range from low rumbles (often used for explosion sound effects in NES games) to high whistling hisses. In the Gunmetal Arcadia titles, I use noise for a majority of sound effects but also for the drum parts in the background music, with short blips of noise at various pitches standing in for kicks and snares.
Ignoring the DPCM channel and its lo-fi samples, these four voices represent the entire sonic landscape available to designers on the NES or those attempting to evoke it. With a little creativity, however, these simple waveforms are sufficient to create a wide array of interesting tones.
Before I move on to discussing my workflow, I should note one last limitation of the NES’s 2A03 processor: all simultaneous music and sound effects were limited to these same four or five voices. In a vast majority of NES games, this meant that part of the background music would drop out to make room for sound effects. Although I did simulate this behavior in Super Win the Game, players objected to it, and I shipped with it disabled before cutting the feature entirely in Gunmetal Arcadia. So that’s one of those places where I’m breaking the rules now: I can exceed the number of allowed voices by playing multiple pieces of music or sound effects on top of each other.
Having established our goals, let’s talk about how I went about composing music in this format.
As I mentioned, my earliest implementation of this synth developed for You Have to Win the Game utilized an MML-like language. This was a fun throwback to my early days of BASIC programming, but it was tedious and error-prone and simply would not scale well for a polyphonic synth. When I began working on Super Win and studying the details of NES audio, it became clear I would need a better solution for authoring melodies.
I had had prior experience composing MIDI files in an old version of Cakewalk Home Studio, a predecessor to the current SONAR line. I knew it would be convenient to compose in this environment, but in order to do so, I would need to either be able to play back MIDI files at runtime using synth voices or else convert MIDI files to a proprietary format offline. I chose the latter.
After a crash course in the MIDI file format — one of the nicer formats I’ve had the opportunity to work with, as it turns out! — I put together a small command line application that would load a MIDI file, parse all the relevant event data (note on/off events, primarily, but also pitch and volume changes and more), and play it back using 2A03-like synth voices. It would then output a minimal representation of this same event data that could be more quickly loaded and played back as runtime.
(It’s important to remember, before you ask why I didn’t simply save out the waveform output and load WAV, MP3, or Ogg Vorbis files at runtime, that one of my goals was to allow sound effects to stomp over background music on a per-channel basis, which necessarily meant doing runtime synthesis. Having since eliminated that requirement, a prerecorded solution would be reasonable at this time; I simply haven’t had a reason to make this change because the existing version already works.)
I wrote this command line app for Super Win the Game, and I’m still using it today for the Gunmetal Arcadia titles, but it and its proprietary format have gone through a number of changes themselves. The version I used for Super Win had some fairly strict limitations; the MIDI file was assumed to only use channels 1, 2, 3, and 10, for the two pulse waves, triangle, and noise channel respectively. A fixed duty cycle could be assigned to each pulse wave and could not be changed in the middle of a song. I did support pitch bends and per-note volume adjustments via MIDI events, so I had some measure of expressiveness, but not nearly as much as I would have liked. Especially frustrating was that, in the absence of any way to alter the volume of a voice over the course of a single note, identical notes could not be played legato, as they would be indistinguishable from a single long note!
After shipping Super Win the Game and settling on Gunmetal Arcadia as my next project, I knew I would want to level up my audio tech along with many of my other tools and technology. A key word that kept coming up throughout my earliest notes was expressiveness. This informed my initial tools development, prompting me to craft a better WYSIWYG editor for sprite animations, and it also affected my goals for audio synthesis in these games.
For Gunmetal Arcadia, I wanted to move away from thinking about strictly composing for four voices and move in a direction where I could author music for an arbitrary number of virtual instruments to be distributed across the four available voices as necessary. The MIDI format was already well suited for this paradigm, as it provided sixteen tracks, with a unique instrument per track. The next step was to figure out what would constitute an instrument.
The first and most obvious choice was to add support for ADSR envelopes to specify the volume of a note at any time relative to its on/off events. ADSR curves are well-defined elsewhere, and I won’t go into too much detail, but it is worth mentioning that there is surprisingly little literature about how ADSR curves should handle note on/off events that occur during a previous note’s attack, decay, or release. Does the envelope naïvely jump to its new location, potentially introducing discontinuities in volume, or does it continue from its current location? (And in the latter case, does it rigidly respect the times specified by the envelope, or does it infer a slope or rate of change from those times and from the current position?) As I discovered over the course of writing the Gunmetal Arcadia Zero soundtrack, neither solution is necessarily “correct.” Both behaviors have valid applications, and after going back and forth between the two a few times, I ultimately chose to make “naïveté” a property of my instruments.
As Gunmetal Arcadia is unabashedly influenced by Zelda II, I knew I would need a vibrato effect to recreate the distinctive sound of that game’s dungeons. As long as I was introducing vibrato, it also made sense to add tremolo, although with only sixteen available volume levels to step through, this effect often has to be all or nothing.
I tend to lean on XML frequently, as my engine has well-tested tools for dealing with it, so it made sense to define instruments in an XML file.
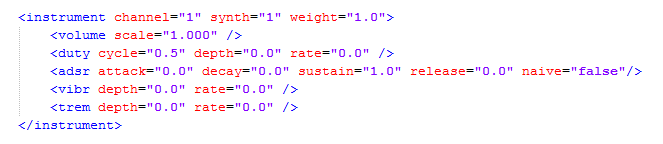
Along with envelopes and effects, I was able to move the previously fixed duty cycle controls into instruments as well. In this way, I could map multiple instruments with different duty cycles to the same pulse wave channel, allowing me to alter sounds in the middle of a composition. I also added depth and rate controls to the duty cycle setting. The actual duty cycle gets clamped to the valid values (12.5%, 25%, 50%, and 75%), but by cycling through these quickly, I can create a rough “swirling” pulse-width modulation effect that was sometimes heard on actual NES games.
I found I had several cases in which it was desirable to apply very quick pitch shifts to some notes. Starting the pitch of bass and drum notes up an octave and quickly sliding back to their actual frequency proved to be a convenient way to add some “punch” to these sounds or to create somewhat convincing synth tom sounds. I stopped short of making this a full-fledged ADSR envelope, as an initial shift and release time was sufficient for all my needs.
It’s worth noting that many of these effects I’m describing are further examples of divergence from struct NES specifications. The NES was capable of applying pitch and volume bends to notes, but it did so in a more rigid fashion, using instructions to tell the voice to begin rising or falling. I saw no reason to simulate this particular behavior, as it would almost certainly be indistinguishable to the listener and would only serve to hamstring my workflow.
After a few iterations of these concepts, I wound up with a revised version of my proprietary format, one that traded a minimal representation for faster runtime synthesis. This version stores the entire state of each voice (frequency, volume, and so on) at every virtual clock cycle, or sixty times per second. This is still fairly compact when compared to raw waveform data which may contain tens of thousands of samples per second, and the entire Gunmetal Arcadia Zero soundtrack clocks in at just over one megabyte in this format.
By preprocessing the note data in this way, the game’s runtime synthesizer can simply keep track of oscillator positions per voice, evaluating the incoming data every sixtieth of a second, and minimizing the amount of work it has to do each tick. In fact, improving runtime perf has become important as the amount of additional postprocessing has grown. In Super Win the Game, there was an optional reverb effect on the synthesizer, and that was the extent of dynamic effects. In Gunmetal Arcadia, the optional reverb is still there, but there are also separate low- and high-pass filters as well as a dynamic DC bias necessary to keep the output waveform centered around zero, as discussed later. (In Super Win, this was unnecessary because I erroneously constructed the pulse, triangle, and noise as zero-centered waves and summed them together. In fact, to accurately simulate the behavior of these voices playing in unison as they would have sounded on the NES, they should be non-negative, requiring a dynamic shift to center the summed output around zero, as modern PC hardware typically expects it to be.)
I’d be remiss if I didn’t discuss the actual runtime synthesis step at least a little. All things considered, this is sort of the easy part, but there are some important caveats to consider.
I’ll assume if you have an interest in audio programming, you already know how to create and access a dynamic looping buffer in which synthesized waveform data of a desired type can be placed, and you are familiar with the concepts of play cursors, write cursors, and the unsafe region in between. This will vary from API to API, of course, but every one I’ve worked with has had some equivalent. (For more on this, see my previous blog on the topic.)
At a high level, the pattern looks like this: we keep track of four oscillators, one for each voice. These advance at a rate determined by the active note frequency. Incoming events can change this frequency and the output level of the voice. As we’ve already preprocessed the data into a convenient form, baking envelopes down into per-tick frequency and volume values, our events will tell us everything we need to know to generate waveform data given an oscillator position. Specifically, these events contain note frequency, volume, duty cycle (ignored except for pulse waves), and looped state (ignored except for noise).
The oscillators cycle through the range [0,1) at the frequency specified by the active note. The oscillator position then determines the output value. Pulse waves are set high when the oscillator position is less than the duty cycle percent and low when it’s above. Triangle waves step from low to high and back across the [0,1) range, and noise is set high or low based on the current LFSR state. (The LFSR state then steps forward each time the oscillator cycles from one back to zero.)
Now, a word on the notion of “high” and “low” wave states: in modern PC applications, we often assume waveform data is signed and centered around zero, so the high state might be some positive value and the low state a negative value, with the amplitude of each varying based on the current volume. However, if we want to accurately model the way the 2A03 would alter the volume of each voice dynamically as others were played, we need to treat waveform state as unsigned, only ever increasing from zero, and only in integer increments. So a pulse wave at minimum volume would alternate between zero and one; and at maximum volume, between zero and fifteen. When not playing data, it would rest at zero. Likewise, the triangle steps from zero up to fifteen and back down.
It should be clear that these values are not appropriate for direct entry into a waveform buffer. We must first mix them together into a single signal, as detailed once again on the Nesdev wiki. The volumes of the pulse waves scale based on each of their outputs, as do the volumes of the triangle, noise, and DPCM channels. These formulas give us output values in the range [0,1] that may be scaled as necessary and entered into the wave buffer for playback by the audio device.
Finally, I’ll mention a few other things that didn’t fit anywhere else.
If a wave goes from zero to full volume instantly, it will produce a “pop” or “blip” artifact. This can be mitigated by enforcing a small minimum attack rate in ADSR envelopes. In fact, regardless of envelope, I always smooth out changes in volume very quickly over the course of 200 samples, or about 4.5ms. This is sufficient to eliminate pops without introducing a perceptible attack.
I mentioned reverb, filters, and DC bias previously. As each of these effects depends on previous samples to produce a new value, there are some issues to consider here. First, it is usually desirable for each of these effects to maintain its own copy of recent samples, rather than trying to snoop back through the audio buffer for recent data. Each effect should then have a chance to act on each incoming sample before it is committed to the buffer.
This next one gets a little tricky, and again, it may vary from API to API. Typically, the audio thread is going to loop endlessly, possibly sleeping from time to time, and either querying the API when awake to ask what region of the dynamic buffer is available, or awaiting a callback from the API to tell it the buffer is available. In either case, the thread should know what region of the buffer is safe to write to. In many cases, this region will overlap with regions that have already been written and may not have been played yet. That gives us two options: we can recognize that we’ve already written valid data to this region and continue writing from the end of that data, or we can redundantly write the same data again. A reason we might want to consider writing redundant data is that it would allow us to place incoming audio (for instance, sound effects in reaction to new game events) in the buffer sooner than we otherwise could, decreasing the perceived latency.
If we choose to do this, we must also modify our effects accordingly. If each effect is keeping track of recent samples entered into the stream, and now we’re stepping back in the stream and entering some of those same samples again, we now have an invalid copy of “recent” data in the effect that actually includes samples from the “future.”
My solution to this is to store two sets of recent data in each effect. One is authoritative, updated once only per sample, and considered to be safe and stable. This covers the region up to the current write cursor; nothing in this region may be rewritten, so these values are never going to change again. The other set of data, representing the region beyond the write cursor, is volatile and may be rewritten multiple times. Before we begin writing waveform data, we copy the stable set to the volatile set, giving the effect a “known good” state to start advancing from. We can then modify incoming samples and write recent data to the volatile set without fear of upsetting our stable set. The next time the audio thread ticks, it will advance through the region between where the write cursor was before and where it is now, updating the stable set as it goes, and creating a new “known good” state.
I’ll close with a blurb for the Gunmetal Arcadia Zero soundtrack. This is the second game soundtrack I’ve written using some version of this tech (Super Win being the first), and I’m thrilled with how it turned out. I hope you enjoy it as well, and I hope you take something useful away from this in-depth look at the process of its creation!
Episode 45: “Patchwork”
In-Dev Build #8
Hey, it’s been like a year since I published a one-off “weekly” in-development build. I probably won’t be resuming these as a regular thing, since week-on-week changes just aren’t substantial enough to warrant it, but since I didn’t have a blog ready to go today and I did have the game in a fairly stable state, I figured I’d give this a another go.
Changes since previous version:
- Tentative level generation with placeholder prefabs
- Tentative level population with enemies and NPCs
- Everything else
Windows: GunArc.zip
Mac OS X: GunArc.dmg
Linux: GunArc.tar.gz
Episode 44: “Sprint”
Hierarchy
After the epic that was last week’s entity-component refactoring recap, I figured I’d do something a little shorter this week. It’s been a while (literal years, in fact) since I’ve drawn up a rough UML diagram of my engine’s most-used classes, and I was curious to see what it would look like now.
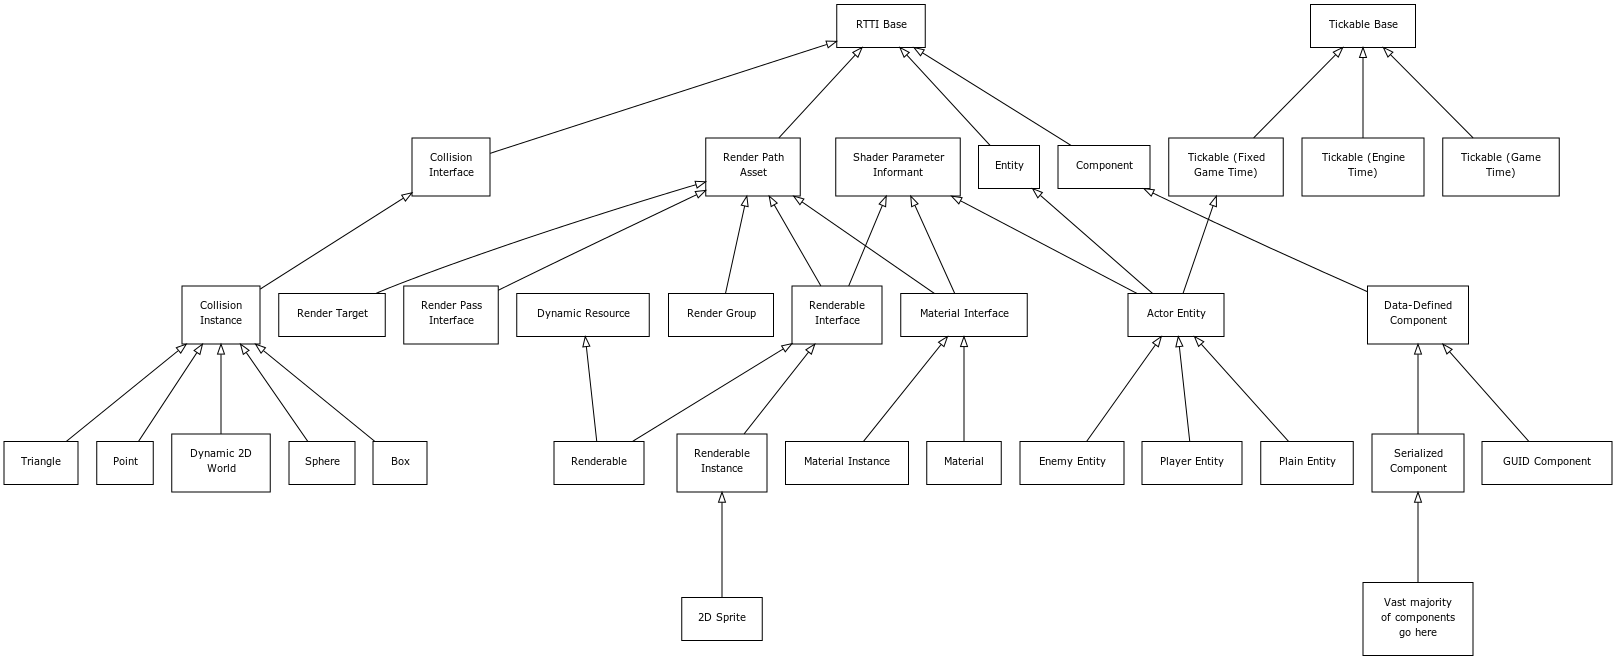
This is by no means a complete tree; many entity and component subclasses have been left off, as well as the vast majority of tickables, a handful of “render path” classes, and probably some others. This also does not indicate important relationships among classes, such as the template/instance pattern used by both the renderable and material classes. But I feel like this provides a decent 10,000 foot view of how my engine is structured in part.
The “RTTI Base” class (short for runtime type information) is the fundamental class from which anything that needs to be dynamically cast at runtime is derived. I don’t use C++ RTTI, but it is on occasion useful to have this information for certain types of objects (especially gameplay-related stuff like entities and components), so I can opt in to this functionality when it’s needed. As I’ve discussed handles in previous blogs, it’s worth noting that every RTTI object gets a handle, which can be used essentially like a smart pointer.
“Shader Parameter Informants” are classes which are capable of setting values for shader parameters (or “uniforms”) at render time. Whether they actually get a chance to set values depends on a number of factors beyond the scope of this post, although that would certainly be a fun topic to cover in its own post in the future. In short, a shader can provide some information in metadata specifying how it expects each of its parameters to be filled out, and the code attempts to reduce the frequency of shader parameter updates by sorting like elements together, so they may be rendered with successive draw calls without changing parameters in between.
A recent addition to this graph is the “render path asset” node and the “render pass interface” derived from it. This is related to a feature that I’d been dreaming up for a while, prototyped on Gunmetal Arcadia Zero, and have continued refining for Gunmetal Arcadia. Prior to these games and the introduction of this system, I’d always defined my render path in code. A typical path might look something like this:
- Clear the depth buffer and/or the color buffer
- Render game objects
- Apply game-specific fullscreen postprocess effects
- Render the HUD
- Render the menu and console if visible
- Apply any remaining fullscreen postprocess effects
In code, I would have to instantiate render targets for each step (where appropriate), match up postprocess shaders to sample from and draw to the correct targets, and so on. This tended to be wordy code, and worse, it tended to be error prone, especially once I started having to deal with toggling various effects off and on at runtime, causing the render path to change. (The CRT sim is a prime example of this.)
Now, I still have the option to define and modify these elements in code if I absolutely need to, but a vast majority of the render path setup and maintenance can be automated through the use of some relatively simple XML markup.
Even saving the shader parameter stuff for another day, there’s many more paths of this hierarchy I could elaborate on, such as the relationship between the collision interface and the transform component (not pictured) which is responsible for informing the collision system of the location of a particular collision primitive. But any one of those would be another long ramble, and I wanted to keep this blog post as high-level as possible, so I’ll wrap it up here.