
It’s been a while since I’ve done a deep dive into some aspect of my engine, so I thought I’d talk a little bit about how control binding works in my engine, some of the concessions I’ve made to support various gameplay requirements, and some general thoughts on input handling best practices.
If I go back to the earliest origins of input handling in my engine, it began with polling a DirectInput device for complete mouse and keyboard state each frame. By comparing the current state to a cached state from the previous frame, I could catch key-up and key-down events in addition to knowing whether a key were pressed (or a mouse button, or whether a mouse axis were moving). This pattern remains the basis for all my input code: poll, compare values against the previous frame’s, and react.
My earliest games and game demos had hardcoded controls simply because I had not taken the time to develop a complete control binding system, but it was always a goal of mine. As I continued developing my engine, it eventually became a topmost priority. The earliest manifestations of this system appeared in August 2008, as I was nearing completion on Arc Aether Anomalies. At the time, I had only gotten as far as abstracting device-specific inputs (keys, buttons, and axes) from high-level game-facing controls (move, shoot, etc.). The specific inputs were still hardcoded, but after an initial setup pass, they were safely abstracted away and never had to be referenced directly again. Instead of asking, “Is the player clicking the left mouse button and/or pressing the right trigger?” I could ask, “Is the player pressing the fire button?” and it would mean the same thing. This simplified my game code by allowing me to test a single value automatically aggregated from any number of sources under the hood, but it would be another two years before this would become a user-facing system that could support arbitrary control bindings defined by the player.
So let’s talk implementation. My engine defines an “input” as any single element of a device which can be polled to produce a value in the range [0, 1]. This may be keys on a keyboard, mouse buttons and axes, gamepad buttons and triggers, analog stick and joystick axes, wheels, sliders, directional pads and POV hats, whatever. The polling methods and return values for each of these vary somewhat from API to API, so my first line of attack in normalizing this data is to bring everything into the [0, 1] range. Sometimes this is trivial; keys are either up (0) or down (1). Most devices report axes independently, so for instance, analog stick axes on gamepads are reported as separate X and Y values in some range, often as signed shorts [-32768, +32767]. This can be scaled down into the [-1, +1] range and then separated into positive and negative axes each in [0, 1]. An exception to this is POV hats (which also usually includes directional pads); these are reported in terms of hundredths of a degree clockwise from the top, or the special value 0xFFFF (32767) to indicate no movement. (As a personal aside, if anyone’s ever encountered a POV hat that took advantage of this precision, I’d be fascinated to learn more. I’ve never seen one that didn’t clamp to eight-way directions.)
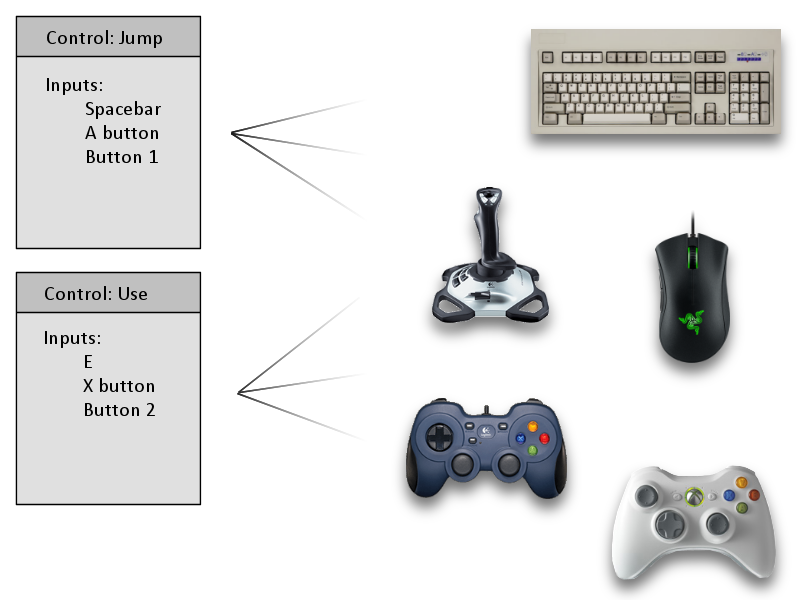
My engine defines a “control” as a list of inputs with a name indicating its purpose in the game (“walk left,” “look up,” “jump,” “attack,” and so on). Controls may also optionally specify rules regarding non-linear scaling and acceleration over time, which is desirable for certain cases like camera rotation in a first-person game. The state of a control may be queried, and the result will be the sum of all its inputs, clamped to [0, 1], with these additional rules applied.
The systems described above were sufficient for shipping Arc Aether Anomalies, but since then, I’ve added support for user-defined control bindings. As you could probably guess, this involves changing the inputs associated with a control at runtime based on player input. This is simple in principle, but there are a number of tricky issues that crop up when putting it into practice.
One of the first “gotchas” I encountered in implementing this was dealing with making input bindings unique. That is to say, if the left mouse button is currently bound to “shoot” and I attempt to bind it to “use,” it should be removed from the “shoot” control. This raises a number of questions about the nature of how controls should or should not overlap. For instance, let’s assume I am using this same control binding system for driving input to menus. It would not be reasonable to assume that the left mouse button could only be associated with shooting in the game or activating buttons in the menu but not both. To address this, I introduced the notion of “control groups.” Each group deals with a different mode or context, and this is transparently displayed within the control binding menus, as seen in this screenshot from Super Win the Game.
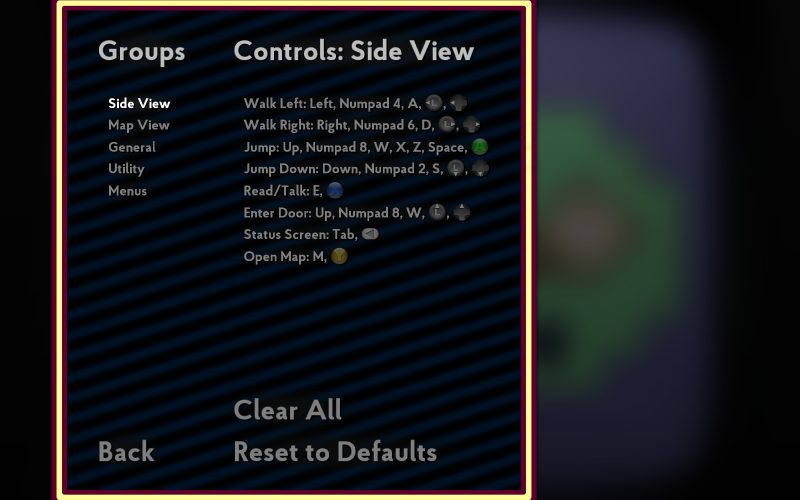
Each input is considered unique only within the context of the current group. Assigning the left mouse button to a control in the “gameplay” group has no effect on its bindings in the “menu” group.
Unfortunately, even this solution has proven to be less than effective as the numbers of actions the player may take has grown with each game I’ve made. In the original You Have to Win the Game, the player’s actions were limited to walking, jumping, and jumping down through shallow platforms. There was essentially no potential for overlap or conflict here. In Super Win, I added some new abilities, including entering doors. The natural default for this control was up: the up arrow key on the keyboard (or W), up on the d-pad, up on the analog stick, whatever device the player might be using, up. This created a conflict in that I was also already using the up arrow key for jumping when playing with the keyboard. Sure, I could have changed that one to Z, X, C, or the spacebar, but it felt wrong to not support both at once. To solve this, I added another system wherein specific controls within the same group can optionally allow the same input to be bound to each. In this way, the up arrow key can be both “jump” and “enter doors” in Super Win.
I’m not totally happy with that solution. It’s an odd one-off backpedaling of another system’s effects, and it’s not made clear to the end user in any way other than trial and error. It would be nice if I could scope my controls better such that these cases simply could not occur, but this doesn’t feel like a viable solution either. Consider the case described above; if “jump” and “enter doors” were merged into a single control, then the A button on the gamepad would activate doors by default, almost certainly never the player’s intent. On the bright side, the fact that this workaround is implemented at the control level rather than the input level means that it’s at least somewhat easy to figure out where these conflicts might arise and suppress them.
I have a whole bunch of input-related notes remaining and no good way to tie them into a larger narrative, so I’m just gonna rapid fire some thoughts here.
Mouse input is an oddity. Unlike most other devices, the values it reports when polled effectively have a delta time premultiplied into them and are unbounded. An analog stick may only be pushed as far as its physical bounds will allow, but a mouse may be pushed arbitrarily far in a single frame. This breaks some of the assumptions I make regarding the [0, 1] range of inputs and requires some workarounds of its own. While a control is actively receiving mouse inputs, it does not do any acceleration or non-linear scaling. This has the desired result on both fronts. Our input value may be well outside the [0, 1] range, which our acceleration and non-linear scaling rules are not equipped to handle, and from the player’s perspective, mouse input should not be subject to these rules anyway, as they could create unnatural, non-1:1 interpretations of the mouse’s movement.
Two-dimensional inputs such as analog sticks require a little bit of special attention. As I mentioned above, I decompose these inputs not only into the separate X and Y axes as they are typically reported by the API, but also into separate positive and negative regions. As I’ve noted, this is advantageous because it allows me to treat all input as being within the [0, 1] range, although it is perhaps a little odd from the user experience, when all four points of the compass have to be bound separately. (Counterpoint: this is arguably the ultimate expression of Y axis inversion.) But regardless of how the axes are represented under the hood, it’s important to recognize that the input exists as a single physical thing in meatspace the real world and handle it accordingly, specifically with regard to dead zones and non-linear scaling.
If you were to draw a picture, what would the dead zones on an analog stick look like? There’s no wrong answer, but it’s important to consider every option so you can make an informed decision. Perhaps the easiest sort of dead zone to implement is a cross- or plus-shaped one. This can be done by clamping the input from each axis separately. There are times this may be desirable, for instance if you want to suppress errant side-to-side motion while holding up/forward in a first-person game. But I tend to prefer circular dead zones, and to accomplish that, we must look at both axes together. We can represent the axes as a two-dimensional vector and then apply dead zone clamping to its magnitude. Then we can decompose the vector into separate X and Y elements and output the result of each.
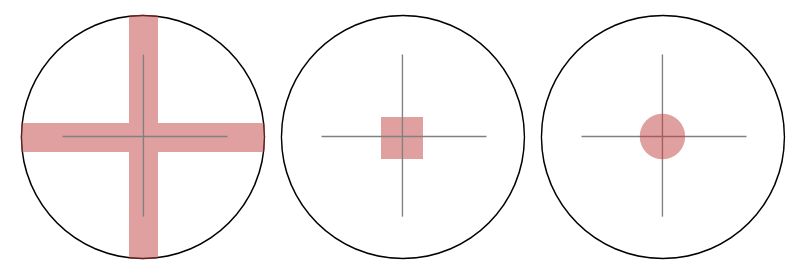
I tend to be fairly aggressive with my dead zones, on account of frustrations I’ve had in the past in which movement persisted even when the stick were released (because it was physically sticking a little bit to one side) and when I could not reach full speed pushing in certain directions. The latter case is where outer dead zones are important. I model both inner and outer dead zones as circles, clamping the magnitude of the 2D vector to within this range and scaling to [0, 1].
Non-linear scaling is an interesting one if only because so many games get it wrong — and I’m not talking about more easily forgiven hobbyist and indie games, I’m talking huge multi-million AAA franchise games. A surprising number of high-profile titles have made the mistake of applying non-linear scaling to each axis independently. It’s perhaps a minor quibble in the big picture, but it’s a crucial part of maintaining a fluid, natural game feel, and I hope by now I’ve made it clear just how important game feel is to me.
So once again, the solution is to combine your X and Y axes into a single 2D vector, apply non-linear scaling to its magnitude as a whole rather than its separate X and Y values alone, then decompose it into its components and return the one you need.
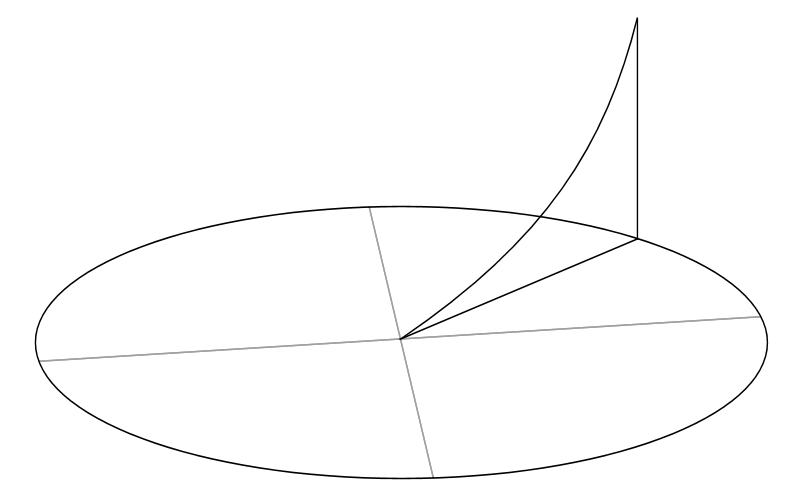
To illustrate why this is important (and possibly ruin a number of otherwise great first-person shooters for you once you notice it), consider the case of pushing the analog stick 45 degrees up and to the right. Assuming a circular gate and perfectly accurate hardware, this should give us X and Y values of 0.707 each (which is ½√2 because the Pythagorean theorem blah blah). I’m ignoring sign here; it’s possible that up on the stick would be negative Y but whatever. Let’s say then that we’re doing some non-linear scaling with a power of two. If we did this on each axis separately, we’d get results of 0.5 for both the X and Y axes. This gives us a resulting magnitude of only 0.707. If we used this method, we’d only be getting 70% of the intended input (70% movement, 70% rotation, etc.) despite the fact that the stick is pushed as far as it’s physically able! If instead, we formed a 2D vector first, its magnitude would be 1.0. Then non-linear scaling with a power of two would have no effect on it, and the resulting magnitude would still be 1.0, correctly representing the player’s intent.
There’s more details I could talk about with regard to my input system, from dealing with a multitude of APIs across each platform, to interpreting manufacturer and device GUIDs to make an educated guess as to how to display button prompts, to ideas for the future to move input to a separate thread that can run at full speed regardless of the game’s state. But this is the nuts and bolts of my control binding system specifically, and I’m pretty happy with how it’s turned out, and hopefully it’s beneficial to players to have the flexibility to define their own control schemes.